Table of contents:
· Validity
· Adaptors
· Connect
· Copy map file into your phone/tablet and open it in TuneECU
· Glossary
Smartphone or tablet Android version 4.4 minimum, dual Core 1.2 Ghz mini and OTG (for connection through USB).
Note:
The cheap phones or tablets with Android Go versions do not have enough memory to run TuneECU and no OTG support for using a USB cable.
You can test your phone or tablet for OTG connectivity with the app "USB Host Test" and / or the app "OTG Troubleshooter" from Google Play Store.
· Cable USB OBD2 KKL FTDI (The cable is the same as the windows version)
· Adapter USB/micro (cable OTG) if needed.
· Optional: Interface Bluetooth ELM327, version 1.4 or 1.5.
Attention: For the Triumph models, which can be reprogrammed via Bluetooth, special Bluetooth adapters like the OBDLink LX or the OBDLink MX or OBDLink MX+ must be used, only these adapters allow the reprogramming of the compatible models (see Bikes list).
Remedy: Download the OBDLink app from the Google Play Store and update the firmware of the OBDLink adapter.
For the Walbro Benelli models, a special converter USB/RS232 cable and AMP Super-Seal connector (6 pin) is required.
For Aprilia, KTM, Benelli, Husqvarna, Ducati, Moto Guzzi, Gilera & Moto Morini ECUs, in addition to the OBD2 cable or Bluetooth an OBD2 adaptor is required and is available from Lonelec (see Adaptors list).
Acer Iconia One 10 B3-A40 Tablet 10.1"
Samsung Galaxy TAB A 10.5" (2018 Android 9.0)
Samsung Galaxy Tab A 8.0 (2019)
Only in the TuneECU Chat and only in english or french language.
Or at the new TuneECU forum , also in english or french only.
Support is only for the TuneECU app, no advice or recommendation will be give on the use of maps.
To get support, the following information are required:
· A brief description of the problem.
· Android device & Android version.
· TuneECU version
· Which connection is used, Bluetooth or cable.
· In the event of Bluetooth problems: which Bluetooth adapter is used? (Manufacturer and software version or firmware version).
· In the event of cable problems: cable manufacturer or supplier.
· Which cable adapter are used (OTG etc.) Manufacturer or source of supply.
· Loaded map in ECU (Map).
· Bike type (model) and year of construction and VIN (FIN).
· Bike is registered in the app?
· Also let us know the content of the "trace.txt" file!!
Without the above mentioned information, no support can be done.
To register, go in the menu "3 dots/License" or "Parameters"
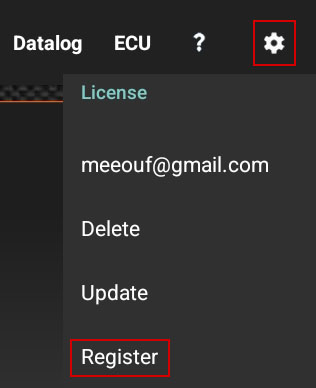
Select "Register" and follow the instructions.
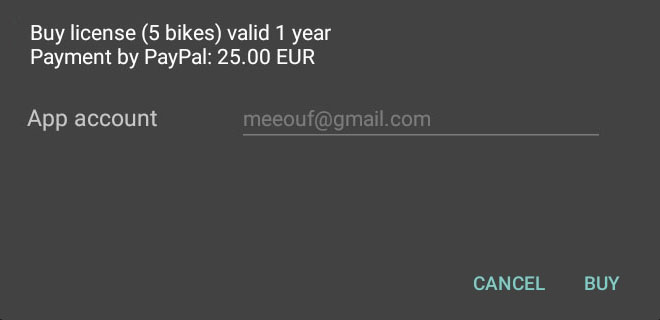
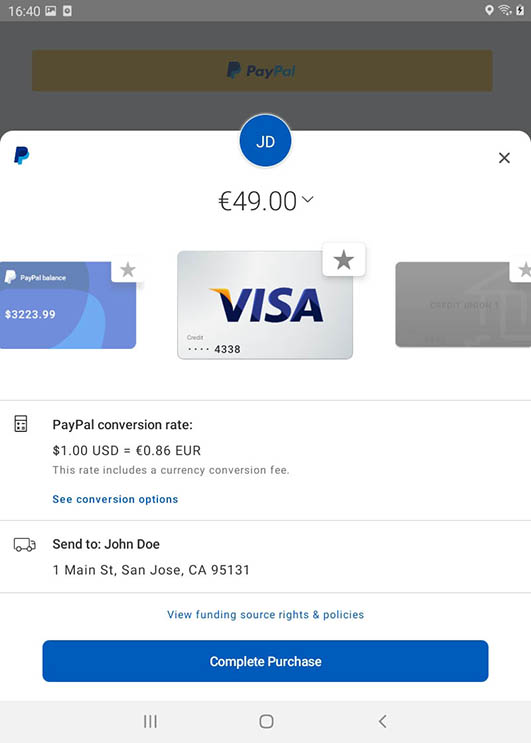
With the App version 5.6 click on "Buy", you will be redirected to PayPal, login with your PayPal account and complete the purchase.
After confirmation of the payment your App will be registered.
With App version up to 5.5 or if you can't pay in the app, enter the PayPal name or account that you will use to do the payment and click on "Buy".
You must connect to your PayPal account and send the payment to meeouf@gmail.com.
If you pay via Wise you must indicate your app account in Reference
When your license will be available, you must be connected to internet when opening the app to automatically update the license or go to the menu "3 dots/License" or "Parameters" and click "Update".
The standard license allows you to register up to 5 bikes. (Register a bike)
To manage an unlimited amount of bikes (for professionals) you must buy the Pro license.
To buy the Pro license (you must have at least one bike registered), go in the menu
"3 dots/License" or "Parameters", select "Buy Pro license" and follow the instructions.
Since 1st September 2023 new licenses are valid 1 year (3 years for the Pro licenses). Check your license validity in the "License" menu and click on your account.
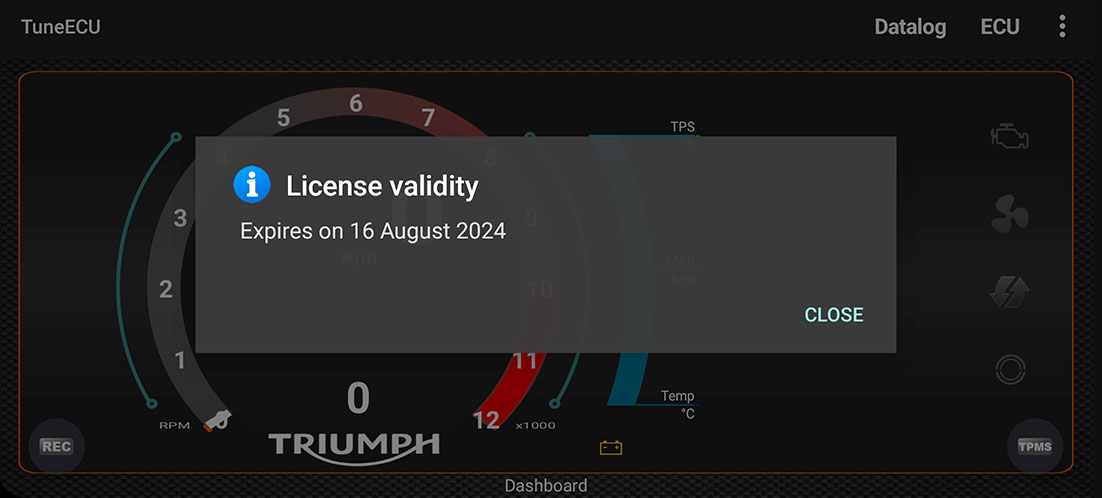
If "No information" is displayed, your license is lifetime.
When expired you must renew the license in the "License" menu.
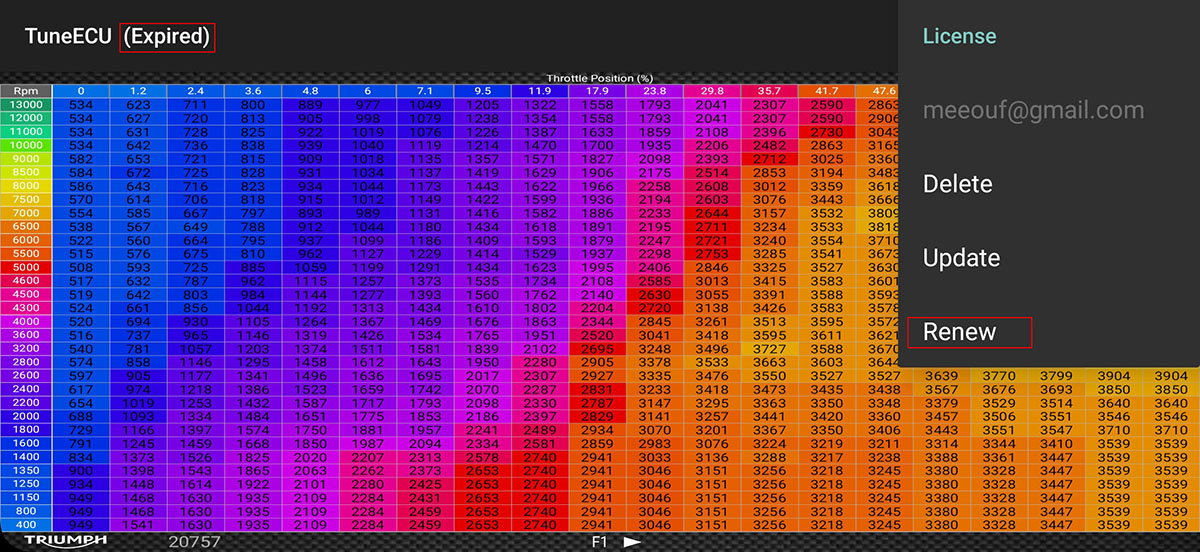
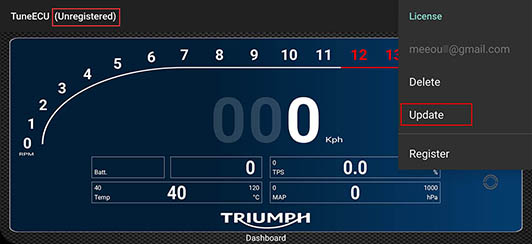
Sometimes (due to prolonged non-use or after an update) the app appears unregistered, in this case you have to update your license in the "License" menu.
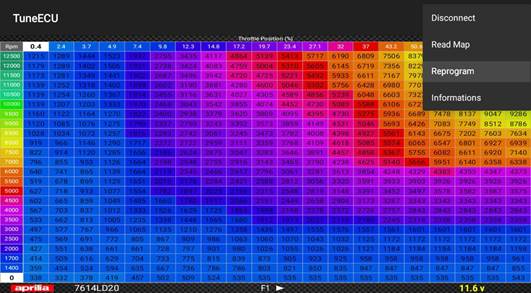
Click on your bike model to see the interface to use and the available features
ECU
Interface: USB KKL cable & BluetoothAdapter: A
Read: USB only
Write: USB only
Tests
Fuel Pump
Idle Speed Control
Adjustments
Reset TPS
ECU
Interface: USB KKL cable & BluetoothAdapter: B
Read: USB only
Write: USB only
Tests
Tachometer
Fuel Pump
Injector
Coil
Adjustments
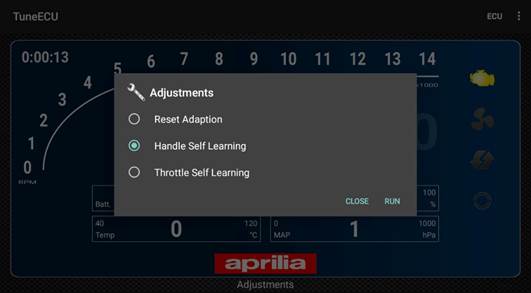
Reset Engine Adaption
Handle Self Learning
Throttle Self Learning
ECU
Interface: USB KKL cable & BluetoothAdapter: B
Read: USB only
Write: USB only
Tests
Tachometer
Fuel Pump
Injector
Coil
Adjustments
Reset Engine Adaption
Handle Self Learning
Throttle Self Learning
ECU
Interface: USB KKL cable & BluetoothAdapter: B
Read: USB only
Write: USB only
Tests
Tachometer
Fuel Pump
Injector
Coil
Adjustments
Reset Engine Adaption
Handle Self Learning
Throttle Self Learning
ECU
Interface: USB KKL cable & BluetoothAdapter: B
Read: USB only
Write: USB only
Tests
Fuel Pump
Idle Speed Control
Injector
Coil
Adjustments
Reset TPSReset Engine Adaption
ECU
Interface: USB KKL cable & BluetoothAdapter: E
Read: USB only
Write: USB only
Tests
Radiator Fan
Fuel Pump
Idle Speed Control
Adjustments
Reset TPSECU
Interface: RS232 to USB converter (4)Read: USB only
Write: USB only
Tests
none
Adjustments
none
ECU
Interface: USB KKL cable & BluetoothAdapter: G
Read: USB only
Write: USB only
Tests
Fuel Pump
SAI
2nd Throttle
O2 Sensor
Injector
Coil
ECU
Interface: USB KKL cable & BluetoothAdapter: F
Read: USB only
Write: USB only
Tests
Fuel Pump
SAI
2nd Throttle
O2 Sensor
Injector
Coil
ECU
Interface: USB KKL cable & BluetoothAdapter: B
Read: USB only
Write: USB only
Tests
Fuel Pump
Idle Speed Control
Injector
Coil
Adjustments
Reset TPSReset Engine Adaption
Reset Service Interval
ECU
Interface: USB KKL cable & BluetoothAdapter: B
Read: USB only
Write: USB only
Tests
Fuel Pump
Idle Speed Control
Injector
Coil
Adjustments
Reset TPSReset Engine Adaption
ECU
Interface: USB KKL cable & BluetoothAdapter: F
Read: USB only
Write: USB only
Tests
Fuel Pump
SAI
2nd Throttle
O2 Sensor
Injector
Coil
ECU
Interface: USB KKL cable & BluetoothAdapter: C
Read: no
Write: no
Tests
Fuel Pump
O2 Sensor
Injector
Coil
ECU
Interface: USB KKL cable & BluetoothAdapter: C
Read: USB only
Write: USB only
Tests
Tachometer
Fuel Pump
SAI
Throttle Motor Drive
O2 Sensor
Injector
Coil
Adjustments
Reset Engine Adaption
ECU
Interface: USB KKL cable & BluetoothAdapter: C
Read: USB only
Write: USB only
Tests
Fuel Pump
SAI
2nd Throttle
O2 Sensor
Injector
Coil
Adjustments
Reset Engine Adaption
TPS or Throttle Cable Adjustment
ECU
Interface: Bluetooth onlyAdapter: D
Read: no
Write: no
Tests
Fuel Pump
SAI
O2 Sensor
Injector
Coil
ECU
Interface: USB KKL cable & BluetoothRead: USB only
Write: USB only
Tests
Tachometer
O2 Sensor
Adjustments
Reset Engine Adaption
ECU
Interface: Bluetooth onlyRead: no
Write: with Bluetooth OBDLink LX/MX,
UCSI-2100 or vLinker MC
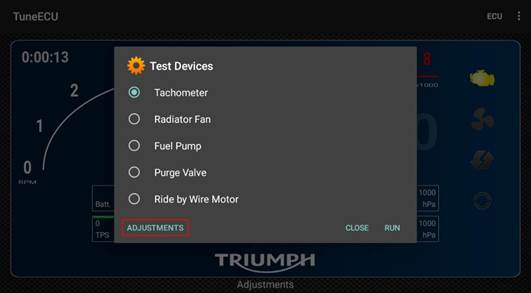
Tests
Tachometer
Radiator Fan
Fuel Pump
Purge Valve
Ride by Wire Motor
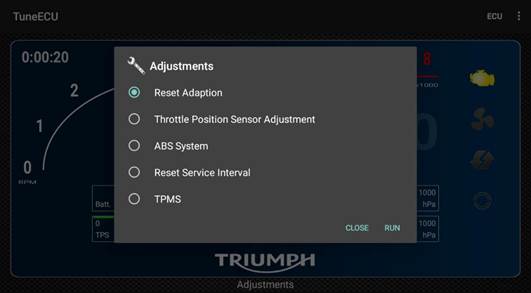
Adjustments
Reset Engine Adaptions
Throttle Position Sensor Adjustment
Reset Service Interval
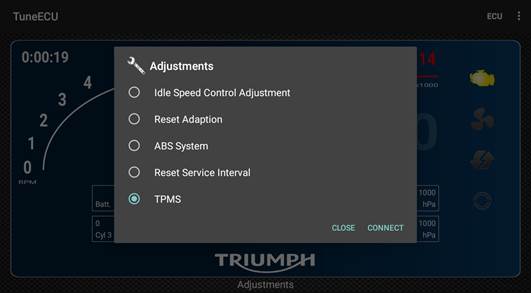
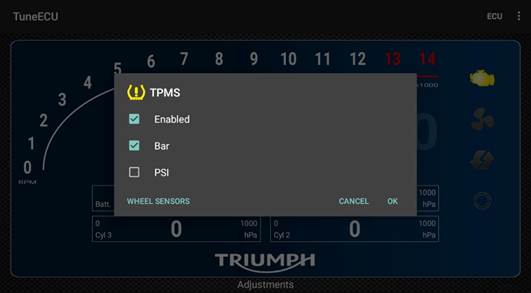
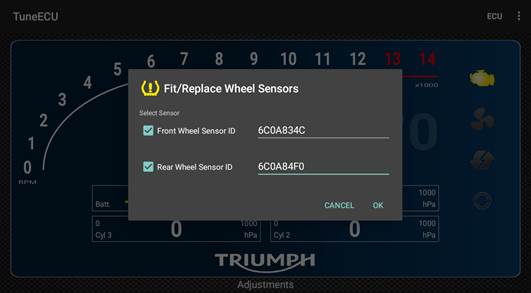
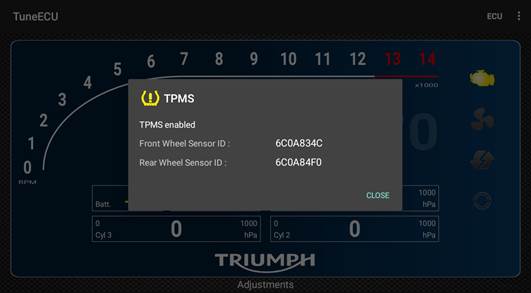
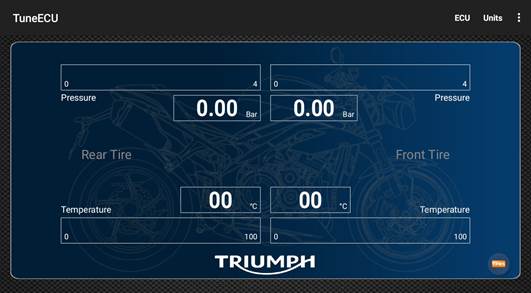
TPMS
ECU
Interface: Bluetooth onlyRead: no
Write: with Bluetooth OBDLink LX/MX,
UCSI-2100 or vLinker MC
Tests
Tachometer
Radiator Fan
Fuel Pump
Purge Valve
SAI
Ride by Wire Motor
Adjustments
Reset Engine Adaptions
Throttle Position Sensor Adjustment
Reset Service Interval
TPMS
Reset Gear Position/Neutral Position Adaption
Reset Shift Force Sensor Adaption
Crankshaft Position Adaption (Europe only)
ECU
Interface: USB KKL cable & BluetoothRead: USB only
Write: USB only
Tests
Tachometer
Radiator Fan
Fuel Pump
Idle Speed Control
Purge Valve
SAI
2nd Throttle
Adjustments
Reset TPS
Idle Speed Control Adjustment
ECU
Interface: USB KKL cable & BluetoothRead: USB only
Write: USB only
Tests
Tachometer
Radiator Fan
Fuel Pump
Idle Speed Control
Purge Valve
SAI
Air Flap
Exhaust Valve
Adjustments
Reset Engine Adaption
Idle Speed Control Adjustment
Exhaust Valve Adjustment
ECU
Interface: Bluetooth onlyRead: no
Write: with Bluetooth OBDLink LX/MX,
UCSI-2100 or vLinker MC
Tests
Tachometer
Radiator Fan
Fuel Pump
Purge Valve
SAI
Exhaust Valve
Adjustments
Reset Engine Adaption
Idle Speed Control Adjustment
Exhaust Valve Adjustment
Reset Service Interval
TPMS
ECU
Interface: Bluetooth onlyRead: no
Write: with Bluetooth OBDLink LX/MX,
UCSI-2100 or vLinker MC
Tests
Tachometer
Radiator Fan
Fuel Pump
Purge Valve
SAI
Ride by Wire Motor
Adjustments
Reset Engine Adaption
Exhaust Valve Adjustment
Throttle Position Sensor Adjustment
ABS System
Reset Service Interval
TPMS
Reset Gear Position/Neutral Position Adaption
Reset Shift Force Sensor Adaption
ECU
Interface: Bluetooth onlyRead: no
Write: with Bluetooth OBDLink LX/MX,
UCSI-2100 or vLinker MC
Tests
Tachometer
Radiator Fan
Fuel Pump
Purge Valve
Ride by Wire Motor
Adjustments
Reset Engine Adaptions
Throttle Position Sensor Adjustment
Reset Service Interval
TPMS
ECU
Interface: USB KKL cable & BluetoothRead: USB only
Write: USB only
Tests
Tachometer
Radiator Fan
Fuel Pump
Idle Speed Control
Purge Valve
SAI
2nd Throttle
Adjustments
Reset Engine Adaption
Idle Speed Control Adjustment
ABS System
ECU
Interface: Bluetooth onlyRead: no
Write: with Bluetooth OBDLink LX/MX,
UCSI-2100 or vLinker MC
Tests
Tachometer
Radiator Fan
Fuel Pump
Purge Valve
Ride by Wire Motor
Adjustments
Reset Engine Adaptions
Throttle Position Sensor Adjustment
Reset Service Interval
TPMS
Reset Gear Position/Neutral Position Adaption
Reset Shift Force Sensor Adaption
Crankshaft Position Adaption (Europe only)
ECU
Interface: USB KKL cable & BluetoothRead: USB only
Write: USB only
Tests
Tachometer
Radiator Fan
Fuel Pump
Idle Speed Control
Purge Valve
SAI
Adjustments
Reset Engine Adaption
Idle Speed Control Adjustment
ECU
Interface: USB KKL cable & BluetoothRead: USB only
Write: USB only
Tests
Tachometer
Radiator Fan
Fuel Pump
Idle Speed Control
Purge Valve
SAI
Adjustments
Reset Engine Adaption
Idle Speed Control Adjustment
ABS System (when fitted)
Reset Service Interval*
*Bluetooth only
ECU
Interface: Bluetooth onlyRead: no
Write: with Bluetooth OBDLink LX/MX,
UCSI-2100 or vLinker MC
Tests
Tachometer
Radiator Fan
Fuel Pump
Purge Valve
SAI
Ride by Wire Motor
Adjustments
Reset Engine Adaptions
Throttle Position Sensor Adjustment
Reset Service Interval
ABS System (when fitted)
TPMS
Reset Gear Position/Neutral Position Adaption
ECU
Interface: Bluetooth onlyRead: no
Write: with Bluetooth OBDLink LX/MX,
UCSI-2100 or vLinker MC
Tests
Tachometer
Purge Valve
Ride by Wire Motor
Exhaust Valve
Adjustments
Reset Engine Adaptions
Throttle Position Sensor Adjustment
Reset Service Interval
Exhaust Valve Adjustment
TPMS
Reset Gear Position/Neutral Position Adaption
Crankshaft Position Adaption (Europe only)
ECU
Interface: Bluetooth onlyRead: no
Write: no
Tests
Tachometer
Purge Valve
Ride by Wire Motor
Exhaust Valve
Adjustments
Reset Engine Adaptions
Throttle Position Sensor Adjustment
Reset Service Interval
Exhaust Valve Adjustment
TPMS
Reset Gear Position/Neutral Position Adaption
Crankshaft Position Adaption (Europe only)
ECU
Interface: USB KKL cable & BluetoothRead: USB only
Write: USB only
Tests
Tachometer
Radiator Fan
Fuel Pump
Idle Speed Control
Purge Valve
SAI
Adjustments
Reset Engine Adaption
Idle Speed Control Adjustment
ABS System
ECU
Interface: Bluetooth onlyRead: no
Write: with Bluetooth OBDLink LX/MX,
UCSI-2100 or vLinker MC
Tests
Tachometer
Radiator Fan
Fuel Pump
Idle Speed Control
Purge Valve
SAI
Adjustments
Reset Engine Adaptions
Throttle Position Sensor Adjustment
Reset Service Interval
ABS System
TPMS
ECU
Interface: Bluetooth onlyAdapter: Euro 5
Read: no
Write: no
Tests
Tachometer
Radiator Fan
Fuel Pump
Idle Speed Control
Purge Valve
SAI
Adjustments
Reset Engine Adaptions
Throttle Position Sensor Adjustment
Reset Service Interval
TPMS
Reset Gear Position/Neutral Position Adaption
Crankshaft Position Adaption (Europe only)
ECU
Interface: Bluetooth onlyAdapter: Euro 5
Read: no
Write: no
Tests
Radiator Fan
Fuel Pump
Purge Valve
Injector
Ignition Coil
O2 Sensor
Adjustments
Reset Service Interval
Learn Neutral Gear Position
ECU
Interface: Bluetooth onlyRead: no
Write: with Bluetooth OBDLink LX/MX,
UCSI-2100 or vLinker MC
Tests
Tachometer
Radiator Fan
Fuel Pump
Purge Valve
SAI
Exhaust Valve
Headlamp
Adjustments
Reset Engine Adaptions
Throttle Position Sensor Adjustment
Reset Service Interval
ABS System
TPMS
ECU
Interface: Bluetooth onlyRead: no
Write: with Bluetooth OBDLink LX/MX,
UCSI-2100 or vLinker MC
Tests
Tachometer
Radiator Fan
Fuel Pump
Purge Valve
SAI
Ride by Wire Motor
Windscreen
Headlamp
Adjustments
Reset Engine Adaptions
Throttle Position Sensor Adjustment
Reset Service Interval
ABS System
TPMS
ECU
Interface: USB KKL cable & BluetoothRead: USB only
Write: USB only
Tests
Radiator Fan
Fuel Pump
Idle Speed Control
Purge Valve
Adjustments
Reset TPS
ECU
Interface: USB KKL cable & BluetoothRead: USB only
Write: USB only
Tests
Tachometer
Radiator Fan
Fuel Pump
Idle Speed Control
Purge Valve
Adjustments
Reset TPS
* If your bike is not listed, so it is not compatible *
Note:
Triumph all models except Tiger 1200 MY 2022+: The Reset Service Interval (when supported) can be done only with a compatible Bluetooth adapter.
Tiger 1200 MY 2022+: The Reset Service Interval can be done only with a Bluetooth OBDLink LX or MX adapter.
1) https://www.lonelec.com/product/tune-ecu-kkl-interface-cable-lead
https://www.obdauto.fr/cable-kkl-special-moto-aprilia-ktm-triumph-moto-guzzi-et-ducati
https://www.lonelec.com/product/obd2-wireless-bluetooth-fault-code-live-data-reader-v1-5
2) https://bafxpro.com/products/obdreader
https://www.obdauto.fr/interface-de-diagnostic-automobile-multi-marques-obd-diag-version-bluetooth
3) https://www.obdlink.com/products/obdlink-lx/
https://www.obdlink.com/products/obdlink-mxp/
https://www.obdauto.fr/obdlink-lx-bluetooth-interface-diagnostic
https://www.bmdiag.co.uk/unicarscan-ucsi-2100-bluetooth-obd2-adapter
4) https://www.lonelec.com/product/tune-ecu-benelli-kit-usb-convertor-benelli-adaptor-walbro
Adaptors
A. https://www.lonelec.com/product/aprilia-obd2-plug-adaptor-cable
B. https://www.lonelec.com/product/moto-guzzi-ducati-3-pin-to-16-pin-obd-adaptor
C. (K-Line) https://www.lonelec.com/product/ktm-obd2-diagnostic-plug-adaptor
D. (CAN) https://www.lonelec.com/product/ktm-obd2-diagnostic-plug-adaptor-tune-ecu-obd2-reader
E. https://www.lonelec.com/product/benelli-sagem-ecu-obd2-plug-adaptor
F. https://www.lonelec.com/product/husqvarna-obd2-plug-adaptor-cable
G. https://www.lonelec.com/product/bmw-10-pin-to-16-pin-obd2-adaptor
H. https://www.lonelec.com/product/euro5-obd2-6-pin-plug-adaptor-cable-obd2-reader
OBD Adapter
For Aprilia, Ducati, Guzzi, Morini...
https://www.lonelec.com/product/moto-guzzi-ducati-3-pin-to-16-pin-obd-adaptor
https://www.obdauto.fr/adaptateur-pour-fiat-et-motos-mv-agusta-ducati-moto-guzzi-moto-morini
For KTM
https://www.lonelec.com/product/ktm-obd2-diagnostic-plug-adaptor-tune-ecu-obd2-reader
Bluetooth connection: Bluetooth OBD adapter ELM 327 1.3a, 1.4 or 1.5.
Important! Avoid buying your Bluetooth adapter on ebay or amazon, there are many chinese clones that do not work properly or not at all on the bikes supported by TuneECU
Some bluetooth adapters recommended
Only for diagnostics & maintenances (no remapping):
ELM327-Blue Scan II (Lonelec UK)
Warning! Only buy from trustworthy sources, BAFX have posted warnings on their website about copies of their products.
To be able to remap the latest Triumph models
OBDLink LX (firmware 4.3.2 or up)
UniCarScan UCSI-2100 (firmware 2.49 or up)
Vgate vLinker MC+ (firmware 4.3.2 or up)
USB connection: Cable USB KKL 409.1 with FTDI chipset.
Some USB cables recommended
https://www.lonelec.com/product/tune-ecu-kkl-interface-cable-lead
https://www.obdauto.fr/cable-kkl-special-moto-aprilia-ktm-triumph-moto-guzzi-et-ducati
Please note that if you buy cables from other sources, these cables are USB OBD2 KKL cables with FTDI chipset (VAG group).
Other cables will not work even if they have a FTDI chipset.
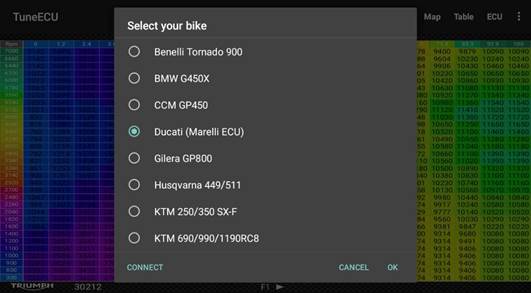
Select your bike in the menu "ECU/Select"
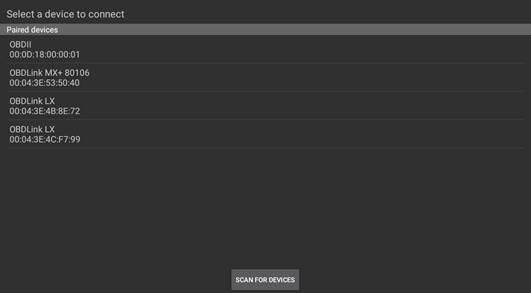
Through Bluetooth: The app ask you to turn ON the Bluetooth if it's not activated.
You must select a Bluetooth device in the list (it will be saved as default after the connection).
If you want to pair a new Bluetooth device click on " Scan for Devices"
The LED at the screen right bottom blinks blue until the app connect to the Bluetooth device.
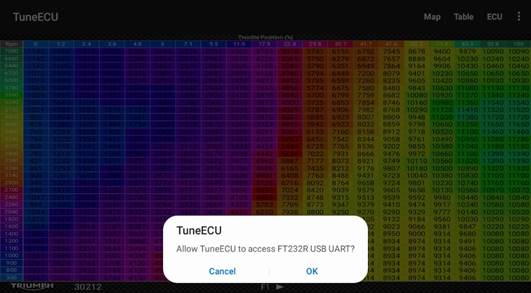
Through USB: When you plug the cable to the phone/tablet the app ask you the permission to use it.
The LED at the screen right bottom blinks RED (initializing the connection to the ECU), then
YELLOW (asking authorization to communicate), then GREEN when the app is connected.
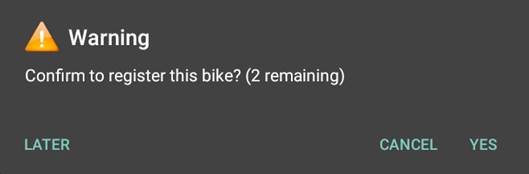
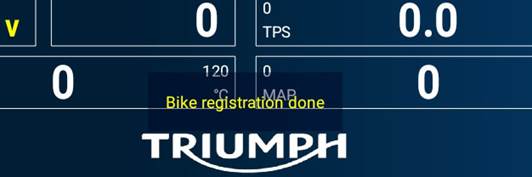
When connecting to a new bike you must register it if you want to do diagnostics, maintenance or remap the ECU.
The app ask you the confirmation to register.
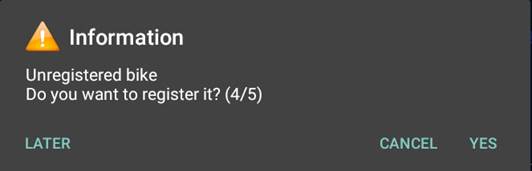
If the app don’t ask you to register go in the menu "ECU/informations" and click "REGISTER"
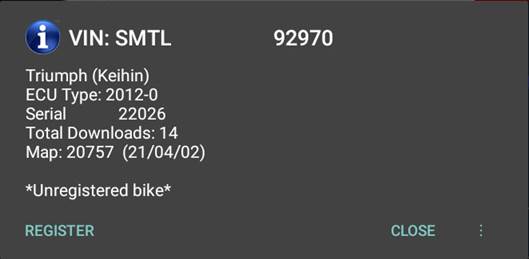
If the internet connection is not available, click "LATER".
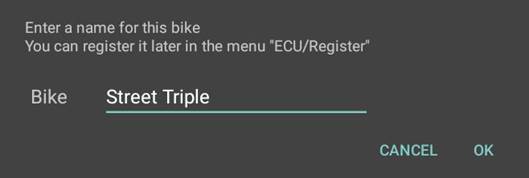
Enter a name for the bike and valid.
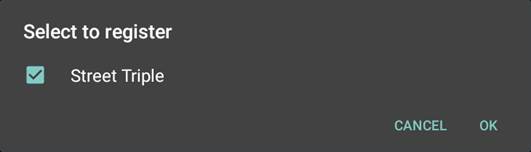
When you will be connected to internet, open the app (don’t connect to the bike) and go to the menu "ECU/Register", select the bike(s) you want register and valid.
The registration confirmation is displayed a few seconds in the bottom of the screen.
When 5 bikes has been registered, you have the possibility to delete one (you must be connected to internet).
Go in the menu "3 dots/License" or "Parameters", click on the number of bikes, then select the bike you want to delete.
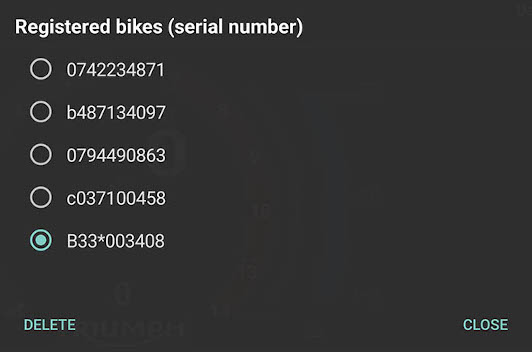
The deleting confirmation is displayed a few seconds in the bottom of the screen.
This operation can be done only one time within 180 days.
Copy map file into your phone/tablet and open it in TuneECU
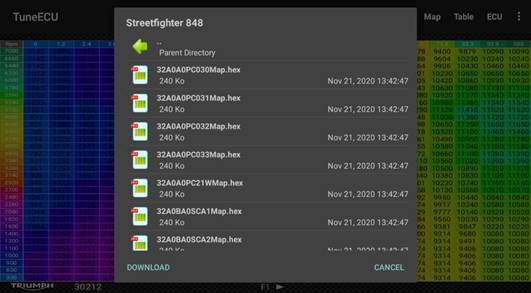
Download the maps directly from the web server
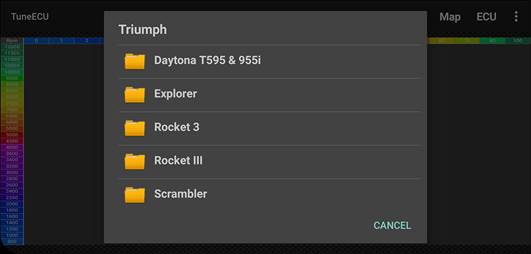
Swipe to Map screen then menu "Open" and "Download" button

Select your bike and the map
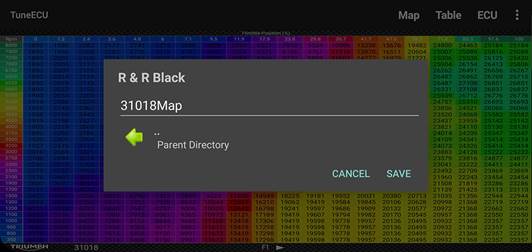
Download the map
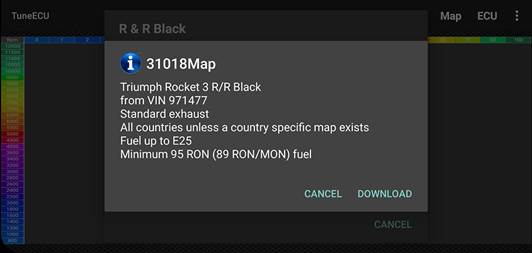
The app can create the sub folders to store the file.
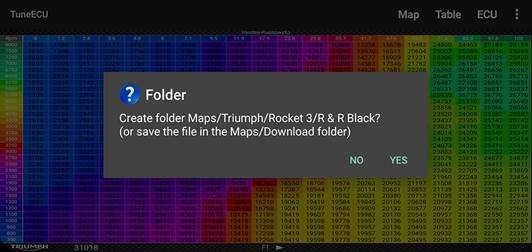
Save the map
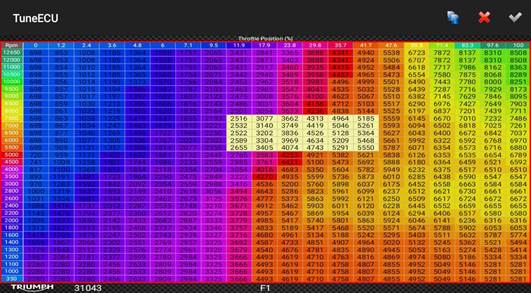
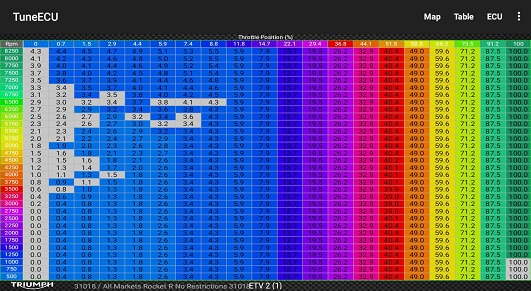
In Map screen
· Open the map
· You must be in the Map screen (swipe the screen to right) and do menu "Open" then select the folder and select the map to load and display.
· "Open" load a map file from your Android device storage or download from the web server.
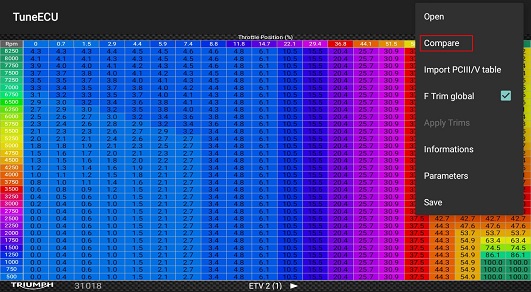
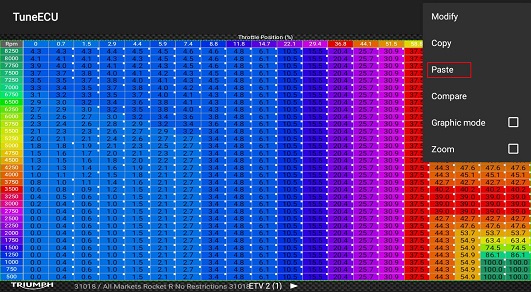
· "Compare" open a 2nd map to compare with the 1st opened.
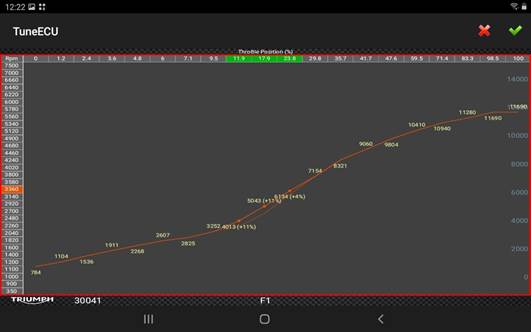
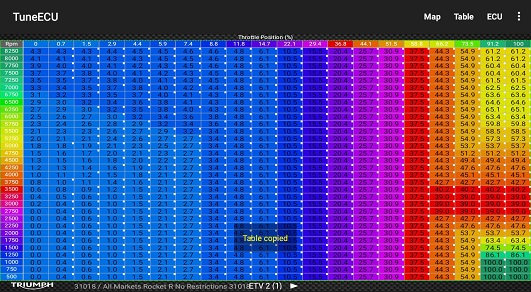
· "Import PCIII or PCV", you can import a PCIII or PCV table in your OEM map, and see this table (F Trim or I Trim) when you swipe the screen to right when you are in the F or I table.
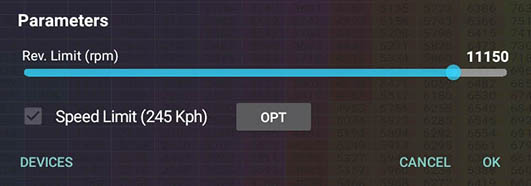
· "Parameters", you can change some parameters of your map, RPM limiter, FAN setting...
· "Devices" button for enable or disable devices, O2 Sensor, SAI...
· In Parameters and Devices, the items available may differ depending of the bike model.
· "Save" save the modifications in the file.
Only with a connection through USB
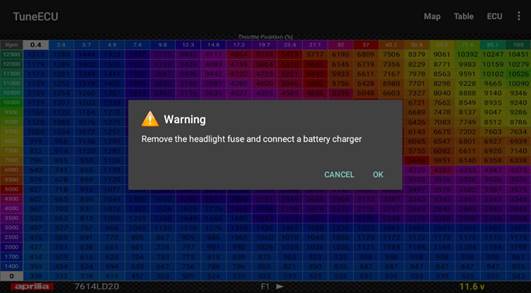
Warning: Remove the headlight fuse and connect a battery charger or a 2nd battery to avoid voltage to drop during the process.
In Map Screen
Connect to the bike and do menu "ECU/Read Map"
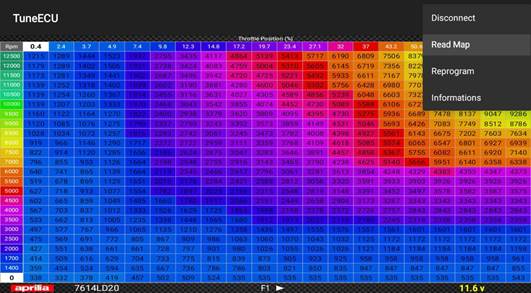
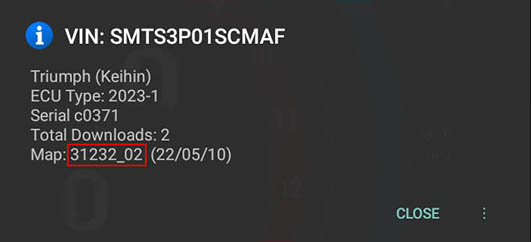
The map name is displayed
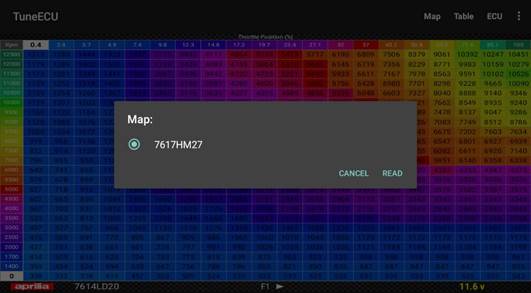
Tips: to reduce the download time, open a similar map as you have in the ECU before the readout.
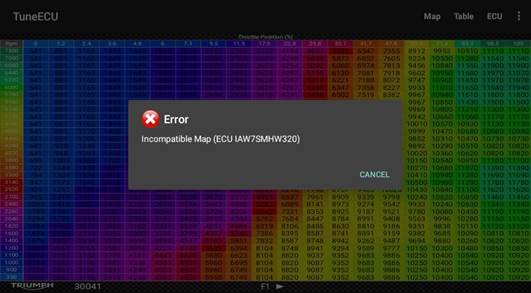
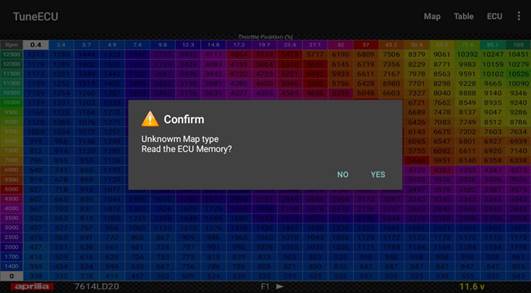
You can get this message, that means the Map is unknown for TuneECU, click "Yes", the ECU do the readout anyway
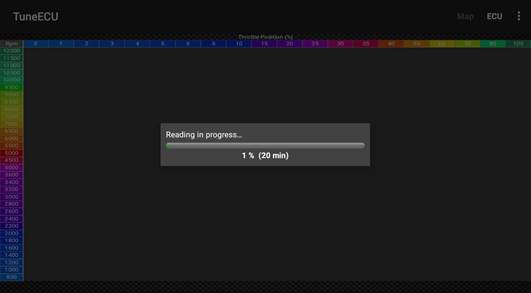
The process can take 5 to 25 min, depend of the type of ECU
The reading is complete and the map displayed in the screen, save it now
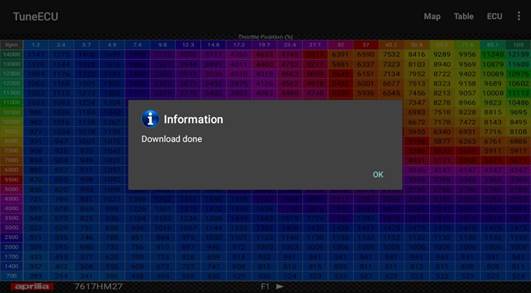
If you got the "Unknown Map" message at the beginning, the Map is not displayed but is saved in the TuneECU folder as a .bin file. Send me this file and i'll add in in the app later.
For many models only via USB, for new Triumph models only via Bluetooth. See bikes list.
Warning: Remove the headlight fuse and connect a battery charger or a 2nd battery to avoid voltage to drop during the process and the download failure.
In Map Screen
The map to download is opened and displayed in the screen.
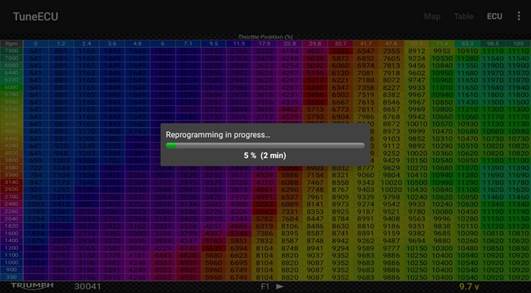
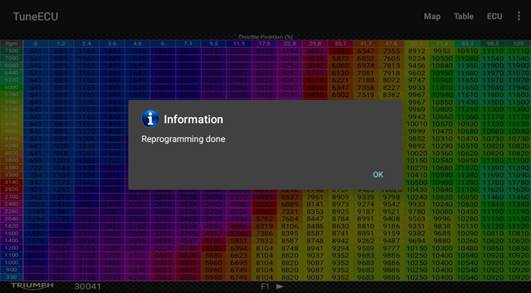
Ignition ON but motor not running, connect to the bike (menu "ECU/Connect") Then do menu "ECU/Reprogram" and valid the 2 warning messages.